OmigoshOmigoshI'mActuallyKeepingWithItOmigoshOmigoshOmigosh
*Ahem*
I mean..... I have been making quite a bit of headway in my latest webcomicing endeavor. *monocle*
I'm talking of course, about
MOROCHEY. I may be just a little bit excited about my new project, so I'm posting about it again. This time, I'm going to show y'all a Morochey page dissected, for a little behind-the-scenes about how the comic is made.
Each comic consists of four basic layers: Color, Line-Art, Bubbles, and Text, in that order.

#1 Color | 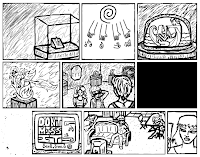
#2 Line-Art |
#3 Bubbles | 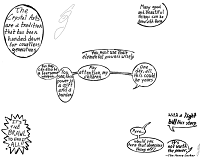
#4 Text |
While that's the order in which the layers lie on the page, it's
not the order in which they're drawn. Here's the process I use, step-by-step...
|
-
- The first thing I do is lay down the line-art. Though I sometimes do a rough sketch beforehand to get an idea of the panel-layout, the entire postable comic is drawn digitally in GIMP.
-
- The line-art is drawn in black (#000000) on a transparent layer. (Note: I do have a plain white layer behind everything else, so I can see what I'm drawing.) The panels are done one-by-one. I use the square-select tool to make a rectangle in the size I need, then draw against the edges with the paintbrush tool to make it blend better with the hand-drawn pictures inside. The pics are drawn basically freehand, with only a few minor edits (such as re-sizing or moving certain elements) here and there.
- Notice the blacked out panel? That's what I call a transition panel. At this point, it's just a rectangle filled in with the paint-bucket tool. Later, however, it will have text drawn on top of it to indicate a change in scene.
|
|
- Next comes the color. The color layer is behind the line-art. First, I color everything in with "flat" colors (no shading, using the paintbrush or bucket), sort of in the same way one would color in a coloring book. After that's done, I color over it with the translucent airbrush tool for shading, highlights, and accents. It helps, at this point, to use the rectangle select tool around the perimeter of the panel I'm working on-- to keep the airbrush from straying outside the lines.
|
|
-
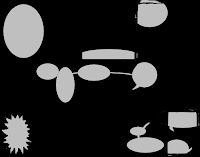
- Here's the tricky part- the text. This is two layers, but I work on both of them at once. The bubble-layer and text-layer will make or break the comic. So much can go wrong, here, and space is everything.
- The bubbles are done one at a time. I use the circle-select tool to make an oval. On the Bubble layer, I fill the whole thing in with white (#ffffff) using the bucket tool. Then, WITHOUT DE-SELECTING THE CIRCLE, I switch to the text layer and use the paintbrush tool to color inside the edge of the bubble- just like the panels.
- Now, here's where I get reeeeeally picky. First of all, the entire Bubble layer is set to 75% transparency. For the text layer, I use a paintbrush tool set to Circle #3 at size .45. I've found that setting works best to draw a thin, precise line that's still bold enough to be seen. For the bold text (see the last panel where Eva says "light bill") I'll use anything from size .77 to .80, depending on how much space I have.
- The lettering, I do by hand. I thought of using a typed font, but I decided against it for two reasons. The first is freedom. When I draw the letters by hand, I can tweak the text on a whim. If I need it bigger, smaller, or a different shape, I can just draw it differently to match the tone and fit the space. The second is style. The hand-written text just blends better with with hand-drawn lines, and I think less contrast between the styles makes it less distracting. Nevertheless, there is a downside. Hand-writing takes forevvvveeerrrr... sometimes I wish I'd chosen type! Oh well, it's worth it in the end.
- Finally, I put the finishing touches on the speech-bubbles. The tails and connectors are drawn by hand, with the white colored behind them. If the bubble is on a dark background, I like to do a little more white around the edges to make them stand out a little more. At last, I stamp on my sig and tag, and the comic is finished.
|
|
|
The end result is this:
Of course this is only the first page. For the whole story so far, you can click on the page to go to Morochey.blogspot.com, bla bla bla, updates every Saturday. I hope you enjoyed this sneak peek at how each page comes together!


No comments:
Post a Comment